Showing posts with label Organizing. Show all posts

Monday, August 13, 2012

"What's for Dinner?" Just Got Easier To Answer: DIY Menu Board

My latest project was so simple and cheep that I'd considered not counting it as a project at all.  But, since I technically think that it is one, I have now crossed off number 11 of 20 DIY crafts/projects on my 30 before 30 list.  (Holla!)

While I was searching for free printables for my Home Management Binder (which I've almost completed--more on that in another post) I came across some amazing menu board ideas.  I especially loved the variety of menu boards that Home Life Simplified has shown here (toward the bottom of the page.)

Although they're all awesome, many of them looked very time consuming and considering I'm beginning to plan my son's birthday party and the holidays will be coming up soon, I just can't see myself making any of them a reality anytime soon.

So, I stuck with the simplest (and in my opinion, one of the cutest) ideas I found:  putting a weekly menu in a picture frame and writing the weekly menu in dry erase markers so that it can easily be erased when it's time to write on it again.

Here's the one I found at Home Life Simplified that gave me the inspiration to create my own:

Source

I had already found this ADORABLE weekly menu plan free printable at The Nest Effect* that I was going to use in my Home Management Binder, but decided it would be perfect for a menu board:

Source

So, I grabbed a frame that wasn't being used, made a few trial and error prints before I got the correct size and viola, dinner menu plan in a frame was born:


I must admit, I got a little giddy once I added this week's dinner plans with the dry erase marker.  I mean, who doesn't like to write with a dry erase marker?  (Am I the only one who never outgrew that phase?)


So, tada!  Easy as pie!  It now sits in our kitchen window sill beside the herbs we're attempting to grow (no luck with the lavender thus far.  sad day.)  The black frame looks great in the window and it's very functional.  No more thinking about what we have in the cabinets and what to make for dinner that night. It's right there on the board.  And, if we decide to go out on Tuesday night to eat with friends, no big deal--erase Tacos and add it to Saturday.  Done deal.

Oh yes, I'm loving the functionality of such a simple project.  This thing will definitely make our lives easier.  


____________________________
* BTW:  The Nest Effect has several other awesome free printables on her site and an Etsy store with even more printables, so be sure to take a look!


Sunday, January 29, 2012

Bathroom Organization: Before And After Pics [Don't Judge Me!]

So, one of my New Years Resolutions is to get organized.  I've tackled a few little projects since the beginning of the year, like getting rid of appliances that we didn't really use, and cleaning out the "junk drawer" in our kitchen.  

But, tonight I (with my husband's help) tackled our bathroom.  

It's amazing how you don't realize how much crap you have shoved onto a counter and under the cabinets of your bathroom until you take pictures of it.  

How did I never notice that our bathroom counter was in complete chaos?  I mean, the rest of our house isn't like this.  But for some reason, makeup, medicine, lotions, and who knows what else have just accumulated on and in our bathroom over the past 2.5 years we've lived here.  Well no more.

Oh, it's sooooo embarrassing to post these "before" pictures but here they are.  Don't judge me.  

counter top:
left is my side & right is hub's side

 my drawer:
no wonder it takes me so long to get ready

hub's drawer

 hub's cabinet
(I forgot to take a picture of my cabinet but it was just as bad.)

 the middle cabinet

I went to Wal-Mart and purchased 4 containers (for less than $2 each) so that I could separate our things into them.  But, before I could use them, I had to take everything out of the bathroom so I could see what the hell we even had under there.  

It took two boxes to haul everything out of our bathroom and into the living room.  I could not believe we had that much stuff in there!  Where did it all come from?!  AHHH!!


I dug in, making different piles for each of the following:  prescription medication, over-the-counter medication, dental care, hair care, nail care, lotions, first-aid, and miscellaneous.  

Then, I started throwing stuff away!  Who needs 18 bottles of lotion?!  WHO?!  And why did I feel the need to keep the stupid single-use shampoos and conditioners you get in hotels?  Obviously because I didn't have enough stuff!  

Other stuff, I combined.  For example, we had like three boxes of Mucinex.  Why?  Probably because we thought we were out of Mucinex because we couldn't find any and so we bought some more.  I also combined things like bandaids.  If they're the same size, there's no need for them to be in two boxes even if one box is Sponge Bob and the other Angry Birds.   

Oh, and I learned something tonight:  When organizing:  zip-lock bags are your friend.  

We ended up eliminated a TON of stuff (probably 1/3) that we didn't need and organized the rest.  Here are the results.  


Look, I have a bathroom counter now!
(And yes, I really take that much medicine to need that weekly pill box.  haha)

And the area under the sink is organized so that we can find everything now!
Each container is organized with common items placed together.
No more searching, I now where everything is!  
It's a Christmas miracle!

This is my husband's cabinet. So clean!

 And my cabinet!
All of my lotions and hair-care products that I use but not regularly are in the pink bag.
All of my finger nail polishes are in the yellow bag above it.

 And here is my drawer:
Everything in it, I use daily.

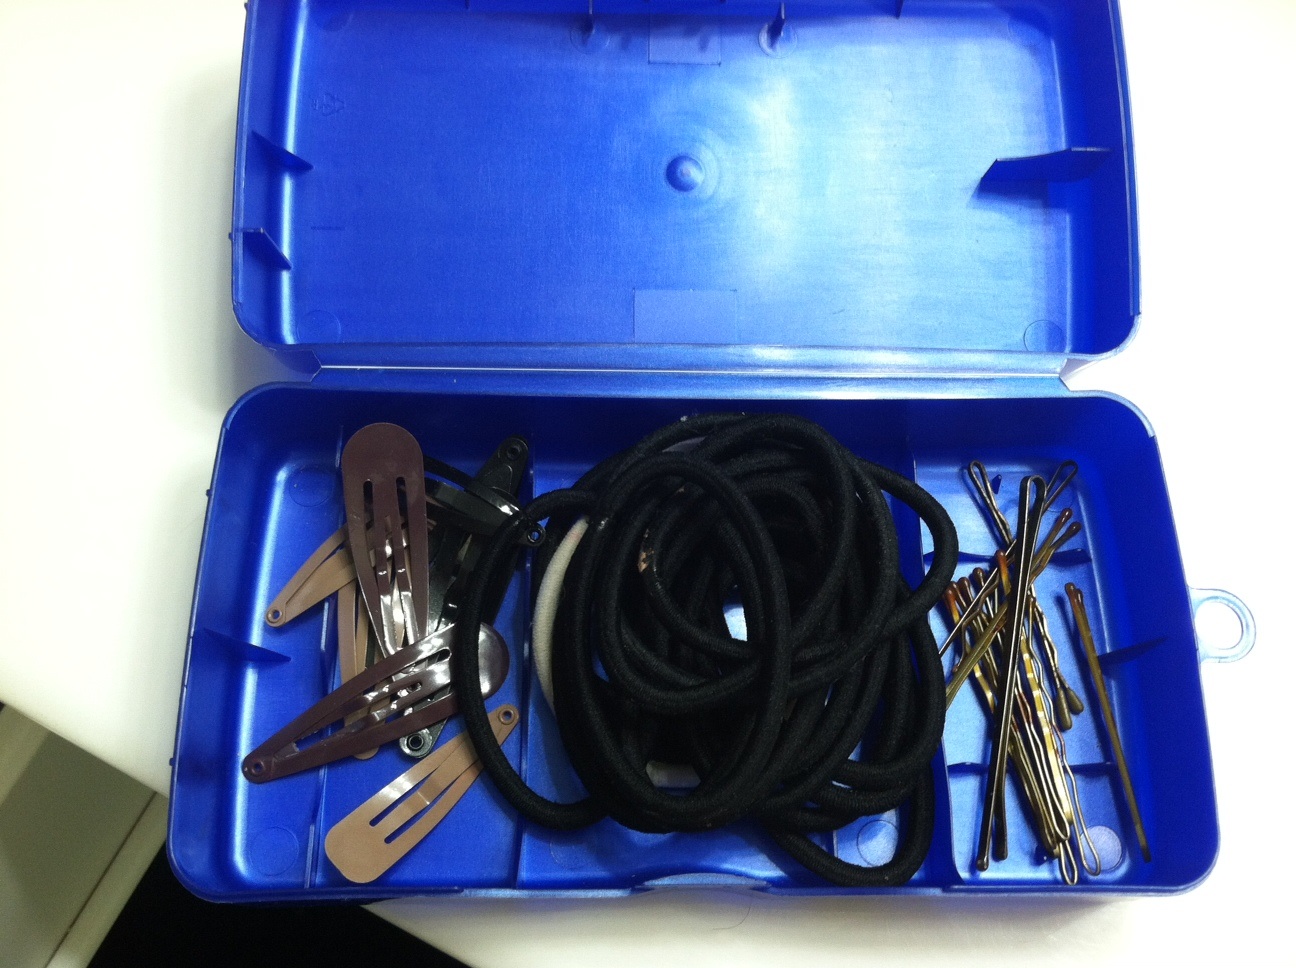
My makeup is in a shallow box lid toward the back so that I can take the box out and then slide it back in when I'm finished.  See the ugly blue container?  My son had a wart a long time ago and the stuff to freeze it with came in that container.  We threw away the medicine (it was expired) but I kept the container.


 Now it holds all of my hair ties, clips, and pins
(I'll do something to pretty up the front of it, but for now it works.)

Oh, and here's the container with all of the first aid supplies.
I put it in a red box under my son's cabinet,
 so that it'd be easily recognizable and easy to get to.

Because I coupon, we tend to have more products on hand than the average family.  So we bought a small shelf to place in our garage to hold these extra products.  This shelf was only $14 and well worth it.  

Right now this shelf is holding 10 boxes of medicine, 8 packages of tissue, 6 sticks of deodorant, and at least 10 bottles of body wash, among other things.  A lot of this was just being stuffed under the bathroom cabinet, which is completely ridiculous because it might be months before we need any of it.  So why was it under there?!  Seriously.  Why?!


I am so, SO happy to have all of that clutter gone.  I honestly don't know how I let it get that bad but I am so glad to have it all organized now.  

Next up?  Organizing all of my crafts supplies!!


Monday, January 23, 2012

Thou Shalt Organize Thy Jewelry: How To Turn A Hanger Into Necklace Storage for $3

Saturday my mother, sister, and I decided to stop into this jewelry store in town.  When we walked in, we realized that almost EVERY piece of jewelry in there was 99¢.  Um, can we say costume jewelry HEAVEN?  This resulted in me purchasing about 8 necklaces, 2 rings, 1 bracelet, and some headbands.  

So, once I got home I realized that I seriously need to organize my jewelry.  I started going through it all, but I couldn't figure out what to do with my really long necklaces.  Then I remembered seeing a neat idea for a hanger turned necklace holder a few months back on Pinterest.  [[Shameless Plug:  Follow me on Pinterest by clicking here!]]

But, since I hadn't pinned it myself and couldn't find it, we had to wing it.  Nonetheless, I'm pretty darn pleased with how this sucker turned out.


Here's what you'll need to make this little beauty:
{1} A drill
{2} A tape measure & pen 
{3} A wooden hanger (Purchased a pack of four at Wal-Mart for $4)
{4} Two packs of hooks (Purchased at Wal-Mart for 98¢ each)

My hubby did all the work for this project, so I can't take any credit for the way it turned out.  It only took him a few minutes to complete it and he was finished before I'd realized he'd started.

First, he counted out how many hooks he wanted to use.  Mine has 16, but we probably could have fit 2-4 more on there.  Then he simply used the tape measure to make sure the hooks would be spaced out evenly, using a pen to mark where he wanted them.  Afterward, he drilled holes for the hooks and screwed them in.  Simple enough.  

Now, all of my necklaces are organized!  I have the jewelry hanger hung on a 3M Strip on the edge of the shelving in our bedroom closet and I love it!  My hubs even made my sister one.  Isn't he the sweetest?  *hold for 'awww'*

So, here she is all prettied up:

YAY!!

Bonus:  My son managed to take four pictures of himself with my iPhone without me noticing in the 35 seconds it took me to put my necklaces on the hanger.  So, I thought I'd share!


What a goofball!  :)