Showing posts with label Projects. Show all posts

Monday, August 13, 2012

"What's for Dinner?" Just Got Easier To Answer: DIY Menu Board

My latest project was so simple and cheep that I'd considered not counting it as a project at all.  But, since I technically think that it is one, I have now crossed off number 11 of 20 DIY crafts/projects on my 30 before 30 list.  (Holla!)

While I was searching for free printables for my Home Management Binder (which I've almost completed--more on that in another post) I came across some amazing menu board ideas.  I especially loved the variety of menu boards that Home Life Simplified has shown here (toward the bottom of the page.)

Although they're all awesome, many of them looked very time consuming and considering I'm beginning to plan my son's birthday party and the holidays will be coming up soon, I just can't see myself making any of them a reality anytime soon.

So, I stuck with the simplest (and in my opinion, one of the cutest) ideas I found:  putting a weekly menu in a picture frame and writing the weekly menu in dry erase markers so that it can easily be erased when it's time to write on it again.

Here's the one I found at Home Life Simplified that gave me the inspiration to create my own:

Source

I had already found this ADORABLE weekly menu plan free printable at The Nest Effect* that I was going to use in my Home Management Binder, but decided it would be perfect for a menu board:

Source

So, I grabbed a frame that wasn't being used, made a few trial and error prints before I got the correct size and viola, dinner menu plan in a frame was born:


I must admit, I got a little giddy once I added this week's dinner plans with the dry erase marker.  I mean, who doesn't like to write with a dry erase marker?  (Am I the only one who never outgrew that phase?)


So, tada!  Easy as pie!  It now sits in our kitchen window sill beside the herbs we're attempting to grow (no luck with the lavender thus far.  sad day.)  The black frame looks great in the window and it's very functional.  No more thinking about what we have in the cabinets and what to make for dinner that night. It's right there on the board.  And, if we decide to go out on Tuesday night to eat with friends, no big deal--erase Tacos and add it to Saturday.  Done deal.

Oh yes, I'm loving the functionality of such a simple project.  This thing will definitely make our lives easier.  


____________________________
* BTW:  The Nest Effect has several other awesome free printables on her site and an Etsy store with even more printables, so be sure to take a look!


Sunday, January 29, 2012

Bathroom Organization: Before And After Pics [Don't Judge Me!]

So, one of my New Years Resolutions is to get organized.  I've tackled a few little projects since the beginning of the year, like getting rid of appliances that we didn't really use, and cleaning out the "junk drawer" in our kitchen.  

But, tonight I (with my husband's help) tackled our bathroom.  

It's amazing how you don't realize how much crap you have shoved onto a counter and under the cabinets of your bathroom until you take pictures of it.  

How did I never notice that our bathroom counter was in complete chaos?  I mean, the rest of our house isn't like this.  But for some reason, makeup, medicine, lotions, and who knows what else have just accumulated on and in our bathroom over the past 2.5 years we've lived here.  Well no more.

Oh, it's sooooo embarrassing to post these "before" pictures but here they are.  Don't judge me.  

counter top:
left is my side & right is hub's side

 my drawer:
no wonder it takes me so long to get ready

hub's drawer

 hub's cabinet
(I forgot to take a picture of my cabinet but it was just as bad.)

 the middle cabinet

I went to Wal-Mart and purchased 4 containers (for less than $2 each) so that I could separate our things into them.  But, before I could use them, I had to take everything out of the bathroom so I could see what the hell we even had under there.  

It took two boxes to haul everything out of our bathroom and into the living room.  I could not believe we had that much stuff in there!  Where did it all come from?!  AHHH!!


I dug in, making different piles for each of the following:  prescription medication, over-the-counter medication, dental care, hair care, nail care, lotions, first-aid, and miscellaneous.  

Then, I started throwing stuff away!  Who needs 18 bottles of lotion?!  WHO?!  And why did I feel the need to keep the stupid single-use shampoos and conditioners you get in hotels?  Obviously because I didn't have enough stuff!  

Other stuff, I combined.  For example, we had like three boxes of Mucinex.  Why?  Probably because we thought we were out of Mucinex because we couldn't find any and so we bought some more.  I also combined things like bandaids.  If they're the same size, there's no need for them to be in two boxes even if one box is Sponge Bob and the other Angry Birds.   

Oh, and I learned something tonight:  When organizing:  zip-lock bags are your friend.  

We ended up eliminated a TON of stuff (probably 1/3) that we didn't need and organized the rest.  Here are the results.  


Look, I have a bathroom counter now!
(And yes, I really take that much medicine to need that weekly pill box.  haha)

And the area under the sink is organized so that we can find everything now!
Each container is organized with common items placed together.
No more searching, I now where everything is!  
It's a Christmas miracle!

This is my husband's cabinet. So clean!

 And my cabinet!
All of my lotions and hair-care products that I use but not regularly are in the pink bag.
All of my finger nail polishes are in the yellow bag above it.

 And here is my drawer:
Everything in it, I use daily.

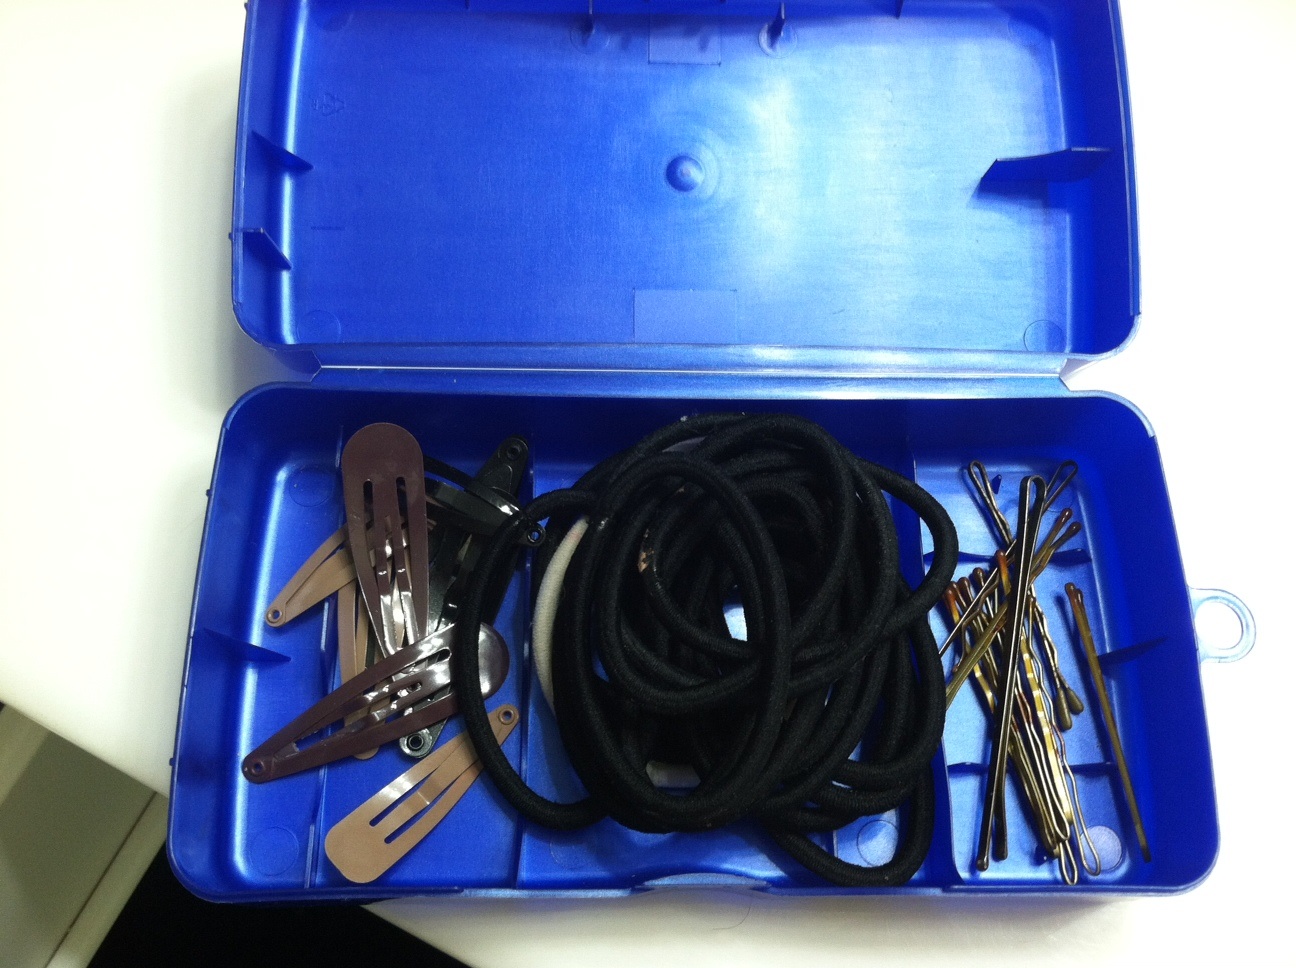
My makeup is in a shallow box lid toward the back so that I can take the box out and then slide it back in when I'm finished.  See the ugly blue container?  My son had a wart a long time ago and the stuff to freeze it with came in that container.  We threw away the medicine (it was expired) but I kept the container.


 Now it holds all of my hair ties, clips, and pins
(I'll do something to pretty up the front of it, but for now it works.)

Oh, and here's the container with all of the first aid supplies.
I put it in a red box under my son's cabinet,
 so that it'd be easily recognizable and easy to get to.

Because I coupon, we tend to have more products on hand than the average family.  So we bought a small shelf to place in our garage to hold these extra products.  This shelf was only $14 and well worth it.  

Right now this shelf is holding 10 boxes of medicine, 8 packages of tissue, 6 sticks of deodorant, and at least 10 bottles of body wash, among other things.  A lot of this was just being stuffed under the bathroom cabinet, which is completely ridiculous because it might be months before we need any of it.  So why was it under there?!  Seriously.  Why?!


I am so, SO happy to have all of that clutter gone.  I honestly don't know how I let it get that bad but I am so glad to have it all organized now.  

Next up?  Organizing all of my crafts supplies!!


Wednesday, October 19, 2011

DIY Angry Birds Birthday Invitations

Hello friends!

I've been absent from blogging for far too long (TWO months... YIKES!) and I think the best way to jump back in is to share this ADORABLE little craft with you!

My son turns six soon and he wants an Angry Birds birthday party.  Well, although Angry Birds merchandise is popping up everywhere, the brand hasn't officially started marketing birthday party paraphernalia.

But, with the help of my good friend Google, I was able to steal find an awesome idea, which made for great invitations!

Meet helmet pig:

Did you just fall in love?  I did!  And I knew I had to make him mine!  It's actually pretty simple, although if you plan on making 30 like I did, be prepared to spend some time.  

Supplies:  
  1. Green, black, grey, white, and brown card stock
  2. 1/2 inch circle punch for eyes
  3. 5/8 inch circle punch for the nose holes
  4. A "large circle" punch for the eyes (about 2 inches in diameter)
  5. A "large oval" punch for the lip
  6. Glue sticks
  7. Blue ink pad
  8. Green ink pad
  9. Sponge
  10. Foam adhesive stickers 
We purchased all of our supplies at Michael's.  

If you want to keep costs down, here's what I recommend:  
  1. Skip the expensive card stock for the whites and blacks and buy one poster board in each color.  The use is so minimal on the finished project that no one will notice it's not card stock.  
  2. Skip the foam adhesive stickers.  (We purchased these, but ended up deciding we liked the way the pigs looked without them.)
  3. Borrow or steal the punch holes!  They're pretty freaking pricey (between $4 to $15 each)!  Ouch!  We choked down the cost and justified it by saying, "Well, at least we'll have them for future projects."  (Yea right.)  But if you know someone who will lend you theirs, do it!  Or, if you have some laying around that aren't the exact sizes I have listed above, don't sweat it.  No one is going to notice if the black circles are 1/2 inch rather than 5/8 inch, trust me.  
  4. Gotta sponge in the garage?  Got a Dollar General down the road?  Great, you've just saved at least $4.  Michael's sells theirs for about $5 each.  It's a freaking sponge people.  Ridiculous.  
  5. Don't have a sponge?  Don't care to buy one?  Great, skip the ink all together.  No one will miss these minute details.  
  6. Instead of making a card that opens up with details on the inside, put the details on the helmet!  You'll use half the green card stock this way!
Okay, so now that we're past all that... let's get down to business!  I promise this is ridiculously easy.  All it takes is time!

Click here to get the pattern.  That's right... there's a pattern!  BUT it will cost you about $5 to download IF you're not already a contributing member to Scribd.  Contribute something, and you can download it and save it to your computer for free.  OR, if you know someone SUPER AWESOME (ahem... ME) who already has the PDF downloaded, you can email HER through the email address conveniently located at the top of her blog and ask her if she'll email you the PDF.  Something tells me that she'll gladly do that.  But just for you, because she likes you.  A lot.  

Now here's all that's left:
  1. Get to cutting!  You'll use the pattern to cut out the helmet, straps, head, and nose.  (If you choose to make a card that opens, you'll want to fold your card stock in half before cutting on the pattern.)
  2. Get to punching!  (Notice: the eyes, nose holes, and lip are NOT to size on the pattern.  You'll use the punches for those.  Easy peasy.)
  3. Get to inking!  If you choose to do this step, you'll lightly ink the outer rim of the pig's head, nose, and lip in green.  You'll lightly ink the rim of the white eyes in blue.  (You can also ink the helmet in white as shown above, but we tweaked ours a little so we skipped this step.)  
  4. Get to gluing!  Everything is glued down with regular glue except for the helmet and the nose.  Those are glued with the foam stickers to make them stick up, if you choose to use those.  
  5. Admire your awesome work.  
Here's how ours turned out:

{The helmet looks crazy because I erased the address and date of the party, 
as well as my phone number using photoshop in about 20 seconds.}

Rather than going by the pattern exactly and making invitations that opened up, I decided to put the details of the party on the helmet.  (This also insures that when the invitations get displayed on the fridge, it's the front of the pig that's showing, rather than the inside.  Haye, I didn't do all this hard work for nothin'!)

Ours obviously aren't as amazing as the one we modeled them from, but considering that 30 of them were made, I'm pretty impressed with myself.  And, of course, I'm using this as one of my DIY projects on My 30 Before 30 List!  Woohoohoo! (<--in my best Angry Birds impression)

Oh, and one more thing.... we purchased 6 x 9 envelopes from Walmart (about $3 for a pack of 25) to mail our invitations in.  The pigs are about 6 x 6 when complete, which makes for a snug fit.  My advice is to keep an envelope in front of you as you're gluing the helmet to the pig so that you can do a quick sight check to make sure you're not putting the helmet up so high that it won't fit into your envelopes.  ;)

The party is quickly approaching, but I hope to have time to for one more Angry Birds project before then.  If I get a chance to make it, I'll be sure to share!  And of course I must say, thank you to all of my followers and readers who have stayed with me during my bloggy break.  I really appreciate you all!  

{Note:  If you need some Angry Birds cake inspiration click here.  Or, you can also see how my son's party and cake turned out by clicking here.}

Thursday, May 19, 2011

DIY Fabric Magnet Board

Number 5 on My 30 Before 30 List is to complete 20 do-it-yourself projects.  I've had a few ideas rolling around in my head but I haven't had the time to complete any of them thanks to those pesky law-school finals.

However, today I made a fabric magnet board for my sister's bedroom (which is pink and black).  It was very easy and cheap to make and I'm happy with the way it turned out.  Want to know how to make your own?  Here you go!

Here's a list of everything you'll need in order to complete your fabric magnet board:
  • A Frame (I purchased a mirror at an antique store for $3 and used the frame from it.)
  • Fabric (I purchased mine from Jo-Ann's.  Click here to find one near you.)
  • Hot Glue Gun & Hot Glue
  • Sheet of Galvanized Steel (I purchased mine from Lowe's for around $10.)
  • Scissors or Metal Sheers (I used regular scissors and they worked fine.)
  • Piece of Foam Board (I purchased mine from Jo-Ann's.  Click here to find one near you.)
  • Spray Paint (and primer if needed)

1) Start by wiping down your frame to remove excess dirt or chipped paint.


2)  Set it up to be spray painted the right way.  Now, the reason I'm including this step is because, while I'm sure all of you already know not to set the item you'll be spray painting directly on the paper because it will get stuck, I learned this lesson the hard way.  


3)  Next, prime it.  I primed the frame using Rust-Oleum and added a second layer after it dried for good measure.  


4)  Next, measure and cut your foam board to fit perfectly inside the frame.  After I did this, I placed it inside the frame just to make sure I measured correctly.  Feel free to skip that part of this step, but I just don't trust myself.  


5)  Get ready to cut your sheet of galvanized metal.  Note:  For this step and any other step where you directly handle the metal wear gloves to avoid getting cut!  

Before cutting I traced around the foam board onto the metal.  Then I measured about 1/4 an inch inside the line I had traced, making the steel slightly smaller than the foam board.  


6)  Now your primer should be dry, so it's time to make your frame pretty!  I applied a semi-gloss spray paint (again I chose Rust-Oleum) and allowed it to dry before applying a second coat.  The frame is now complete!  :)


7)  Glue the sheet of metal to your piece of cut foam board using a hot glue gun. 


8)  After ironing the fabric to get out all the lines and creases, lay your fabric face down and began gluing it to the back of the foam board.  It helps if you have an extra set of hands on this part to insure you pull the fabric tight enough to keep the fabric from sagging or wrinkling.   


9)  Finally, you're ready to place the fabric-covered magnet board into the fame!  I think I jumped for joy when I completed mine because I'm now one step closer to finishing My 30 Before 30 List!


10)  Put that cute little thing to work!  

Now, everyone knows the basic uses of magnet boards, such as holding pictures, receipts, and cards, but Shelterness suggests using a magnet board to hold your makeup!  GENIUS!!  

It's easy!  Just purchase a roll of magnet tape and stick a small piece onto each of your makeup items!

Look at this awesomeness and tell me this isn't a fantastic idea?!  What a great way to get all of that makeup out of that drawer and off your bathroom counter!


Stevie hasn't decided how she's going to use hers yet, but that's her job.  My job here is done!

Special thanks to Shanty 2 Chic for creating the tutorial that helped me through this DIY project 
and allowed me to share my experience with my readers! :)

Saturday, April 9, 2011

The Week of 04.04.2011 In Review

Here are this week's highlights that didn't make it into their own post:

1)  My sister Stevie had a history project due on Wednesday, which meant that we were all up until 1:00am Wednesday morning working on it.  I'm happy to report that she made an 89%!


2)  United States Supreme Court Justice came to speak at my law school Wednesday morning.  I was exhausted, but there was no way I was going to miss it!  Seriously the highlight of my non-existent career thus far!


3)  Maddox had his first t-ball game of the season on Thursday, which was also my first game as coach.  We lost by one run, but he did great!  I'd like to think I did alright as well.  ;)


4)  On Friday, I turned in my graduation application... a very surreal moment for me!!  Isn't she beautiful?

[school identification has been electronically redacted for privacy]

5)  I attempted my first DIY project and failed miserably, ruining these pretty letters which I had such big plans for.  I overestimated my abilities and underestimated the permanence of spray paint, so now they're in the trash.  Live and learn [and go buy more.]


6)  We all enjoyed the beautiful Saturday weather at the park.